Thick Caramilk Cookies
By Jessie
Updated: July 7, 2025
Rate This Recipe
By: Jessie
Updated: July 7, 2025
Rate This Recipe:
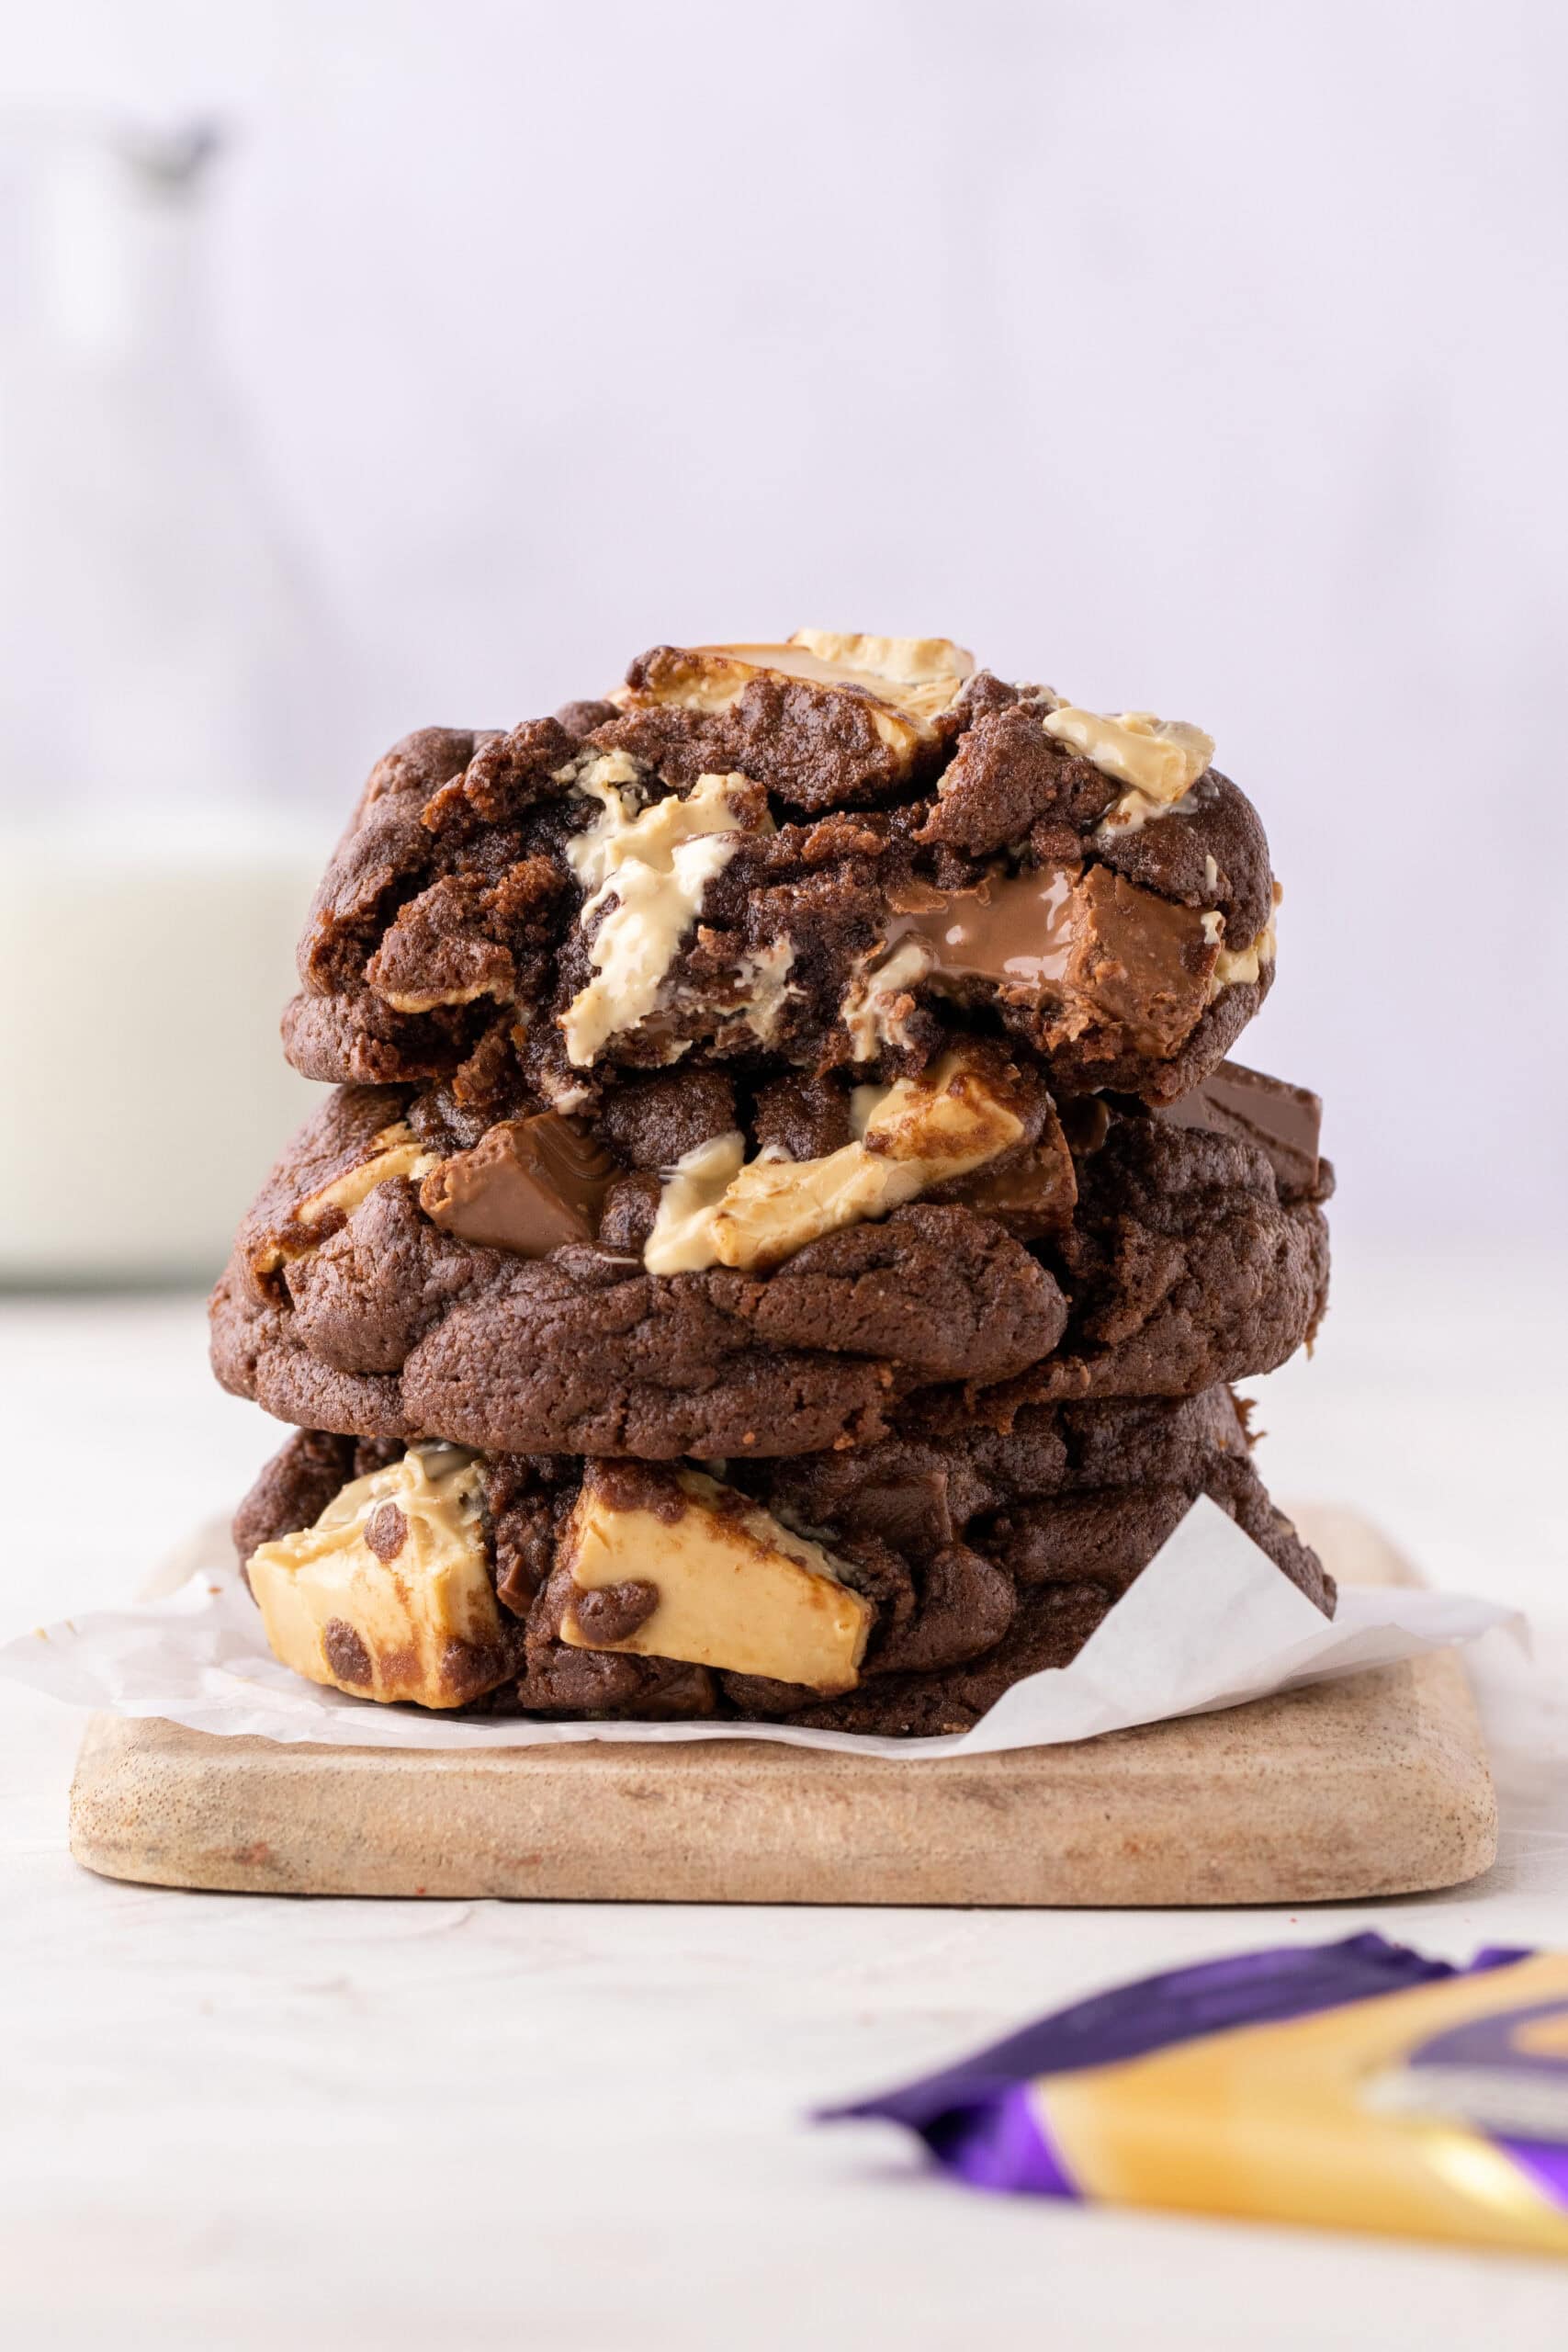
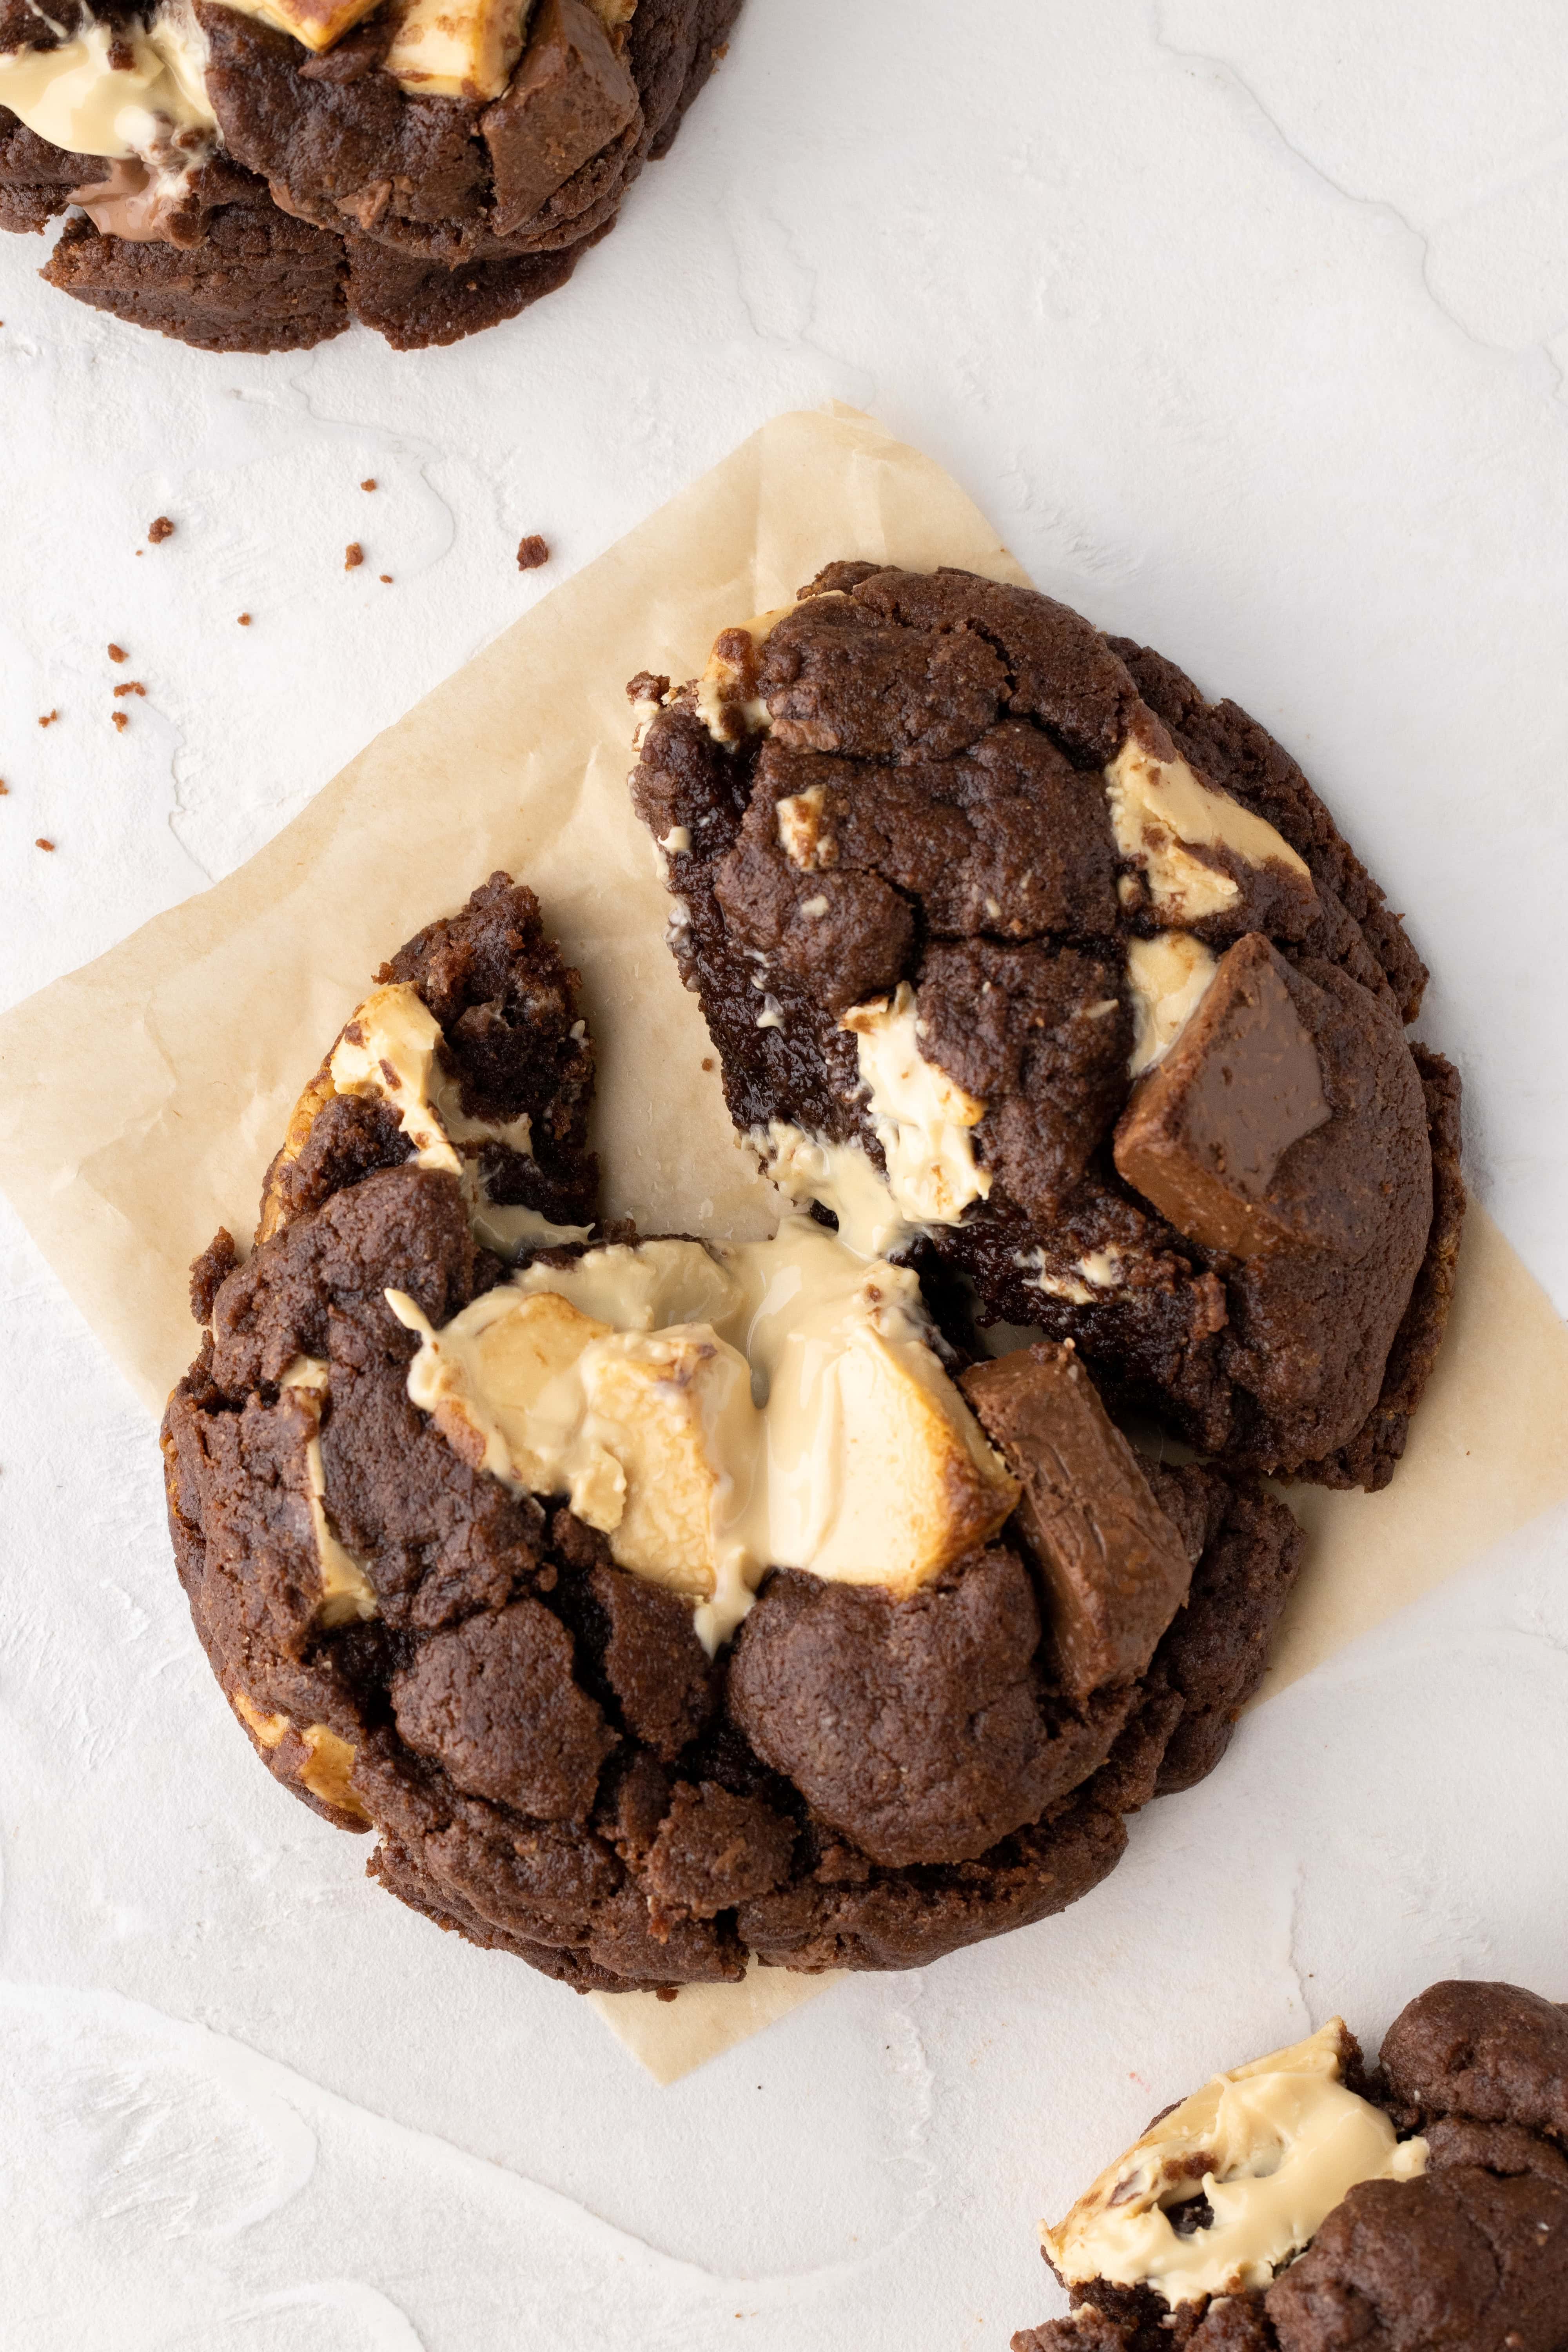
These thick chocolate Caramilk Cookies are crisp on the outside, molten on the inside and chock-a-block with chunks of Cadbury Caramilk!
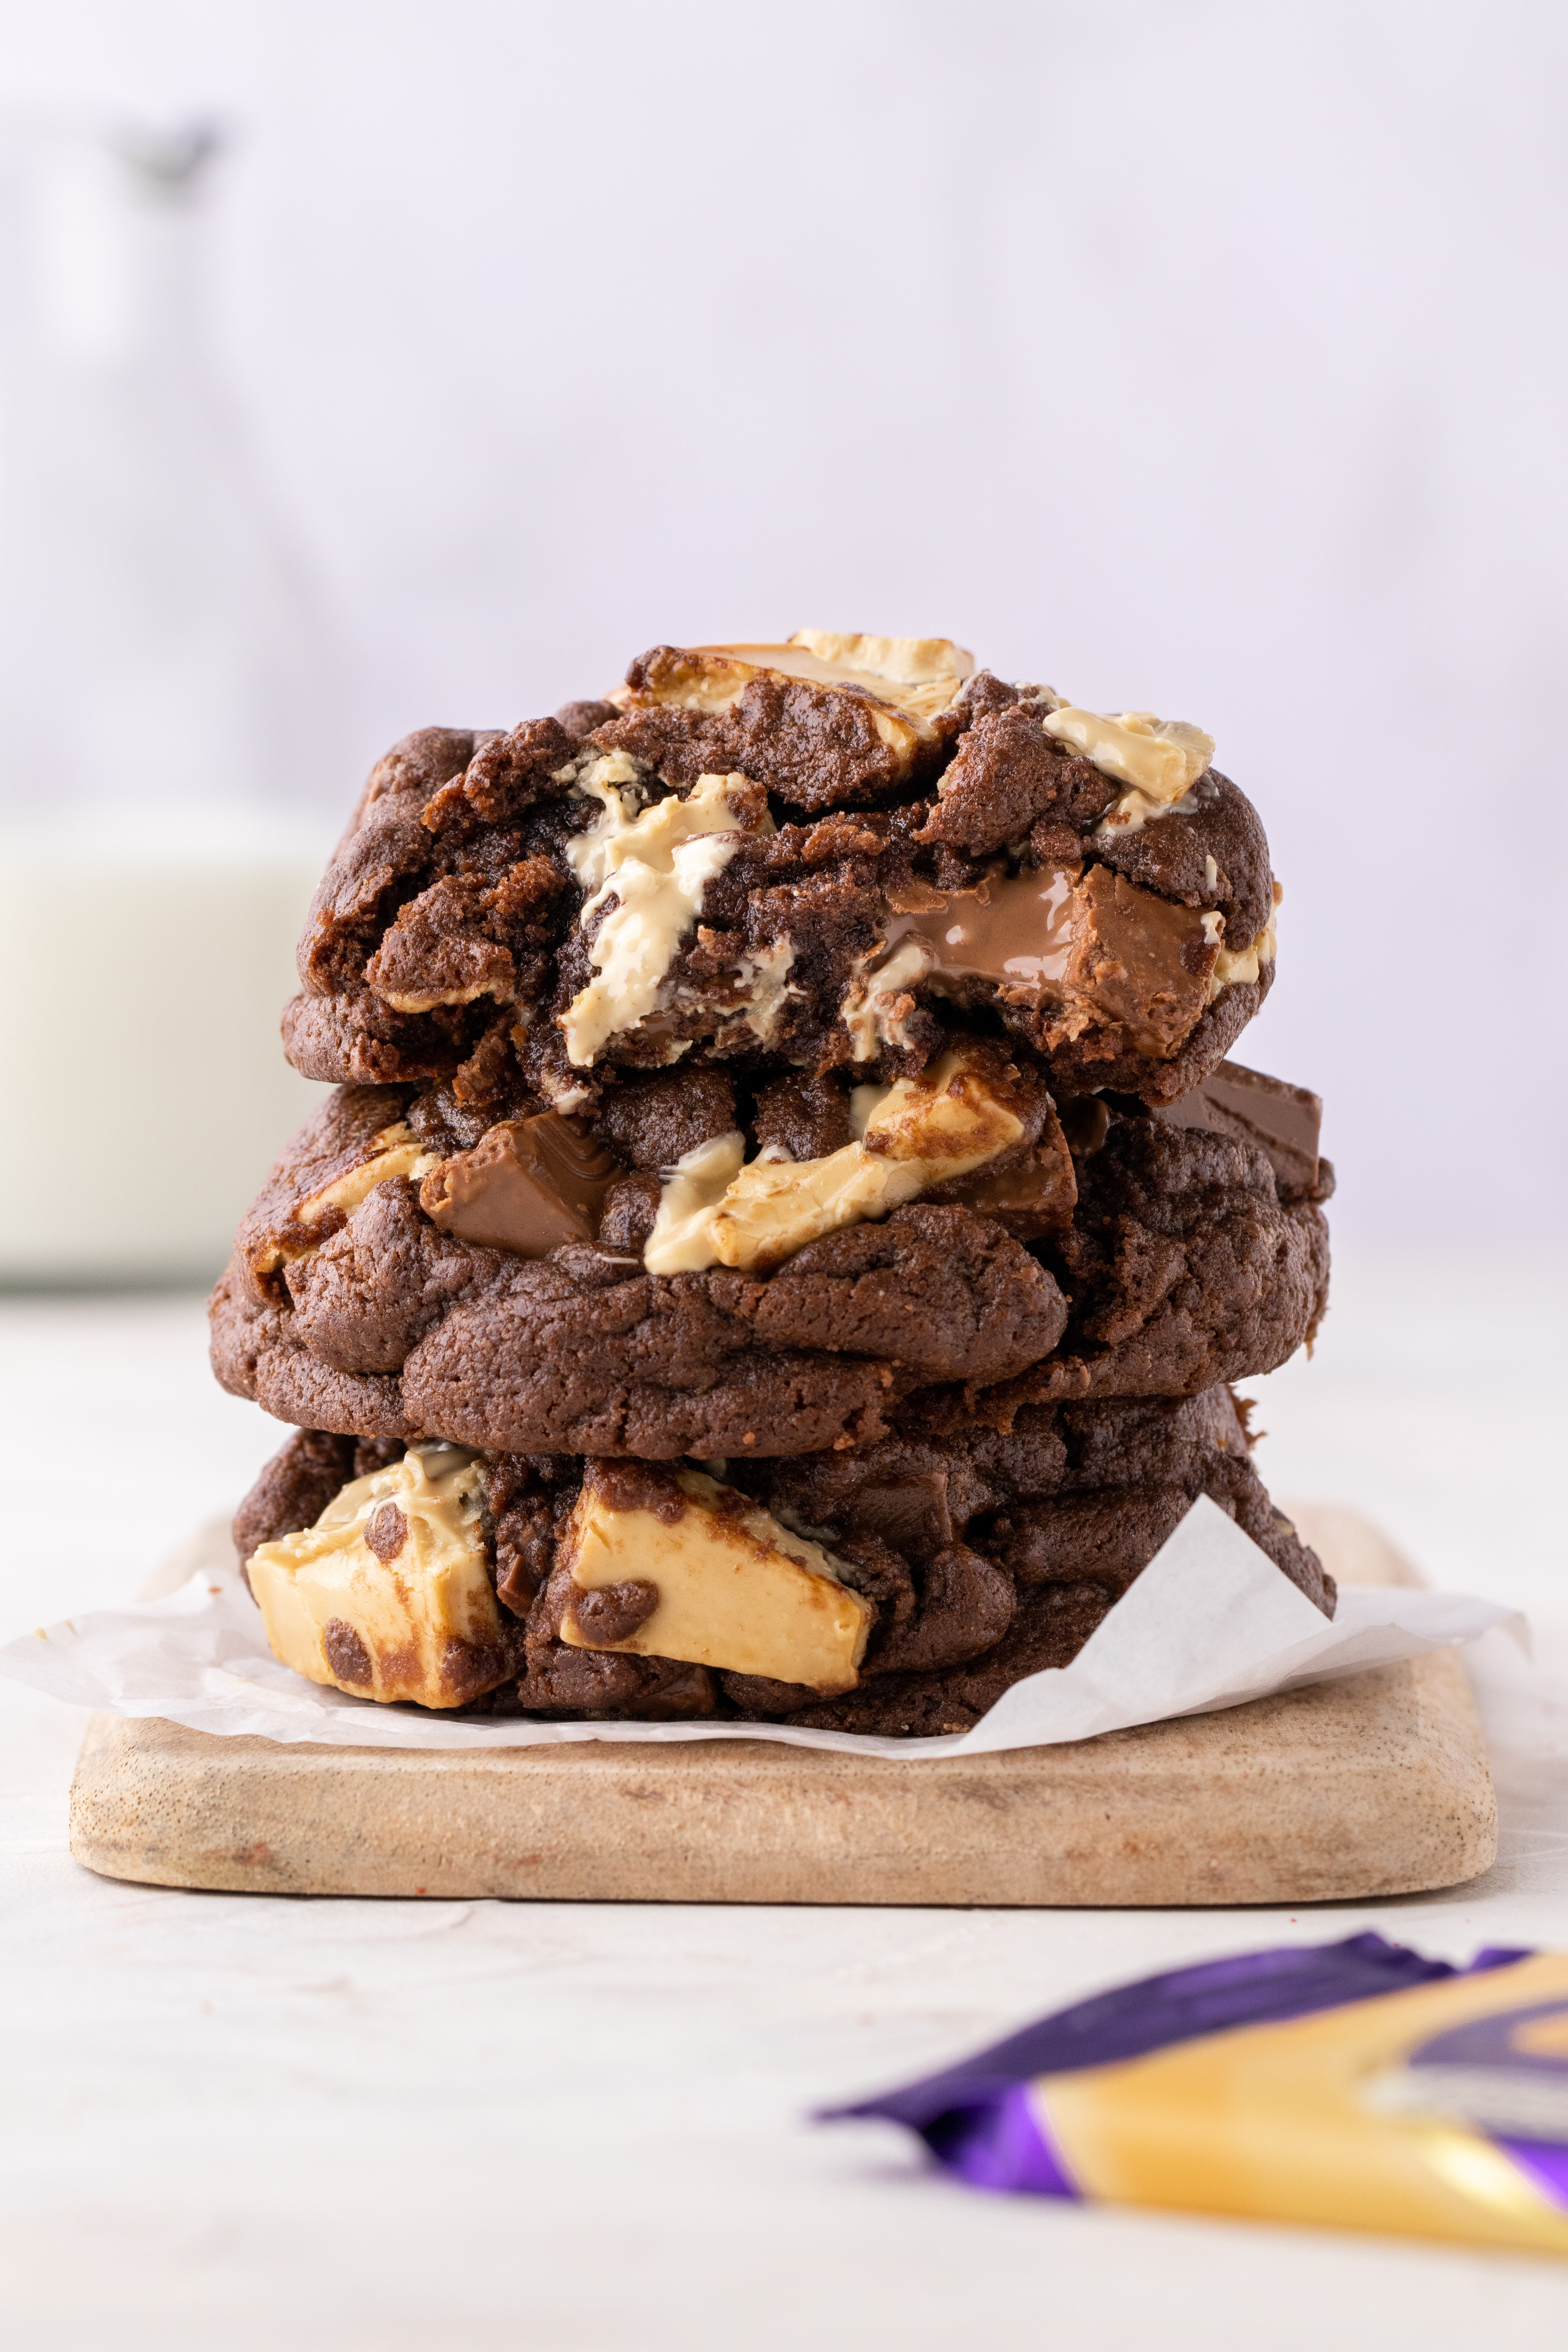
These Caramilk Cookies could well be the BEST cookie recipe I’ve ever created. Yes, they’re THAT good!
You guys went bonkers for my Caramilk Brownies and even more bonkers when I recently shared my Thick Chocolate Chip Cookies recipe, so I had an idea… combine the two into one! If you’ve not tried Cadbury Caramilk before then a) where have you been!? and b) stop reading and get down to the shops now 😅 The best way to describe it is like caramel + white chocolate + vanilla. So imagine big chunks of that but melted into gooey chocolate cookie dough. Delicious!
About these Caramilk Cookies
- Thick and chunky in size
- Stuffed with chunks of Cadbury Caramilk – it tastes like caramelised white chocolate!
- Crisp and crunchy on the outside
- Soft and gooey in the middle
- An easy peasy, one-bowl recipe
Let’s talk texture
What makes these thick Caramilk Cookies extra special is their amazing texture! The outside of the cookie is crisp and slightly crunchy, but on the inside you’ll find gooey cookie dough and pockets of melted Caramilk and milk chocolate. Think NYC Levain Bakery style cookies 😍 Here’s how we achieve this texture:
- Cold butter. Normally cookies are made using room temperature or sometimes melted butter. But not these babies! For Caramilk Cookies you will want to use cold butter to reduce spread in the oven and keep the cookies thick.
- Frozen cookie dough. Baking the cookies from frozen means the outside of the cookie will heat up and cook quicker than the inside of the cookie. This will result in a nice crisp outside but a gooey middle.
- Pre-heated baking tray. Using a pre-heated, dark coloured baking tray will heat up the outside of the cookie more quickly, making it crisp and golden.

Why do I need to freeze the cookie dough?
The short answer… YES! Frozen cookie dough = less spread = thick cookies.
I recommend at least 90 minutes (enough time to tidy up, make a cuppa and watch an episode of your favourite series). BUT (and that’s a big but!) the longer you leave the cookie dough, the thicker your cookies will be. 24-48 hours is ideal!
Because the cookie dough needs to be frozen, this is the perfect recipe to prep ahead if you’re planning to make the cookies for a special occasion. Just prep the dough, roll it into balls and leave them in the freezer for up to 2 months. Bake your Caramilk Cookies at the last minute so they’re fresh, gooey and delicious!

Quick tip for shaping your Caramilk Cookies
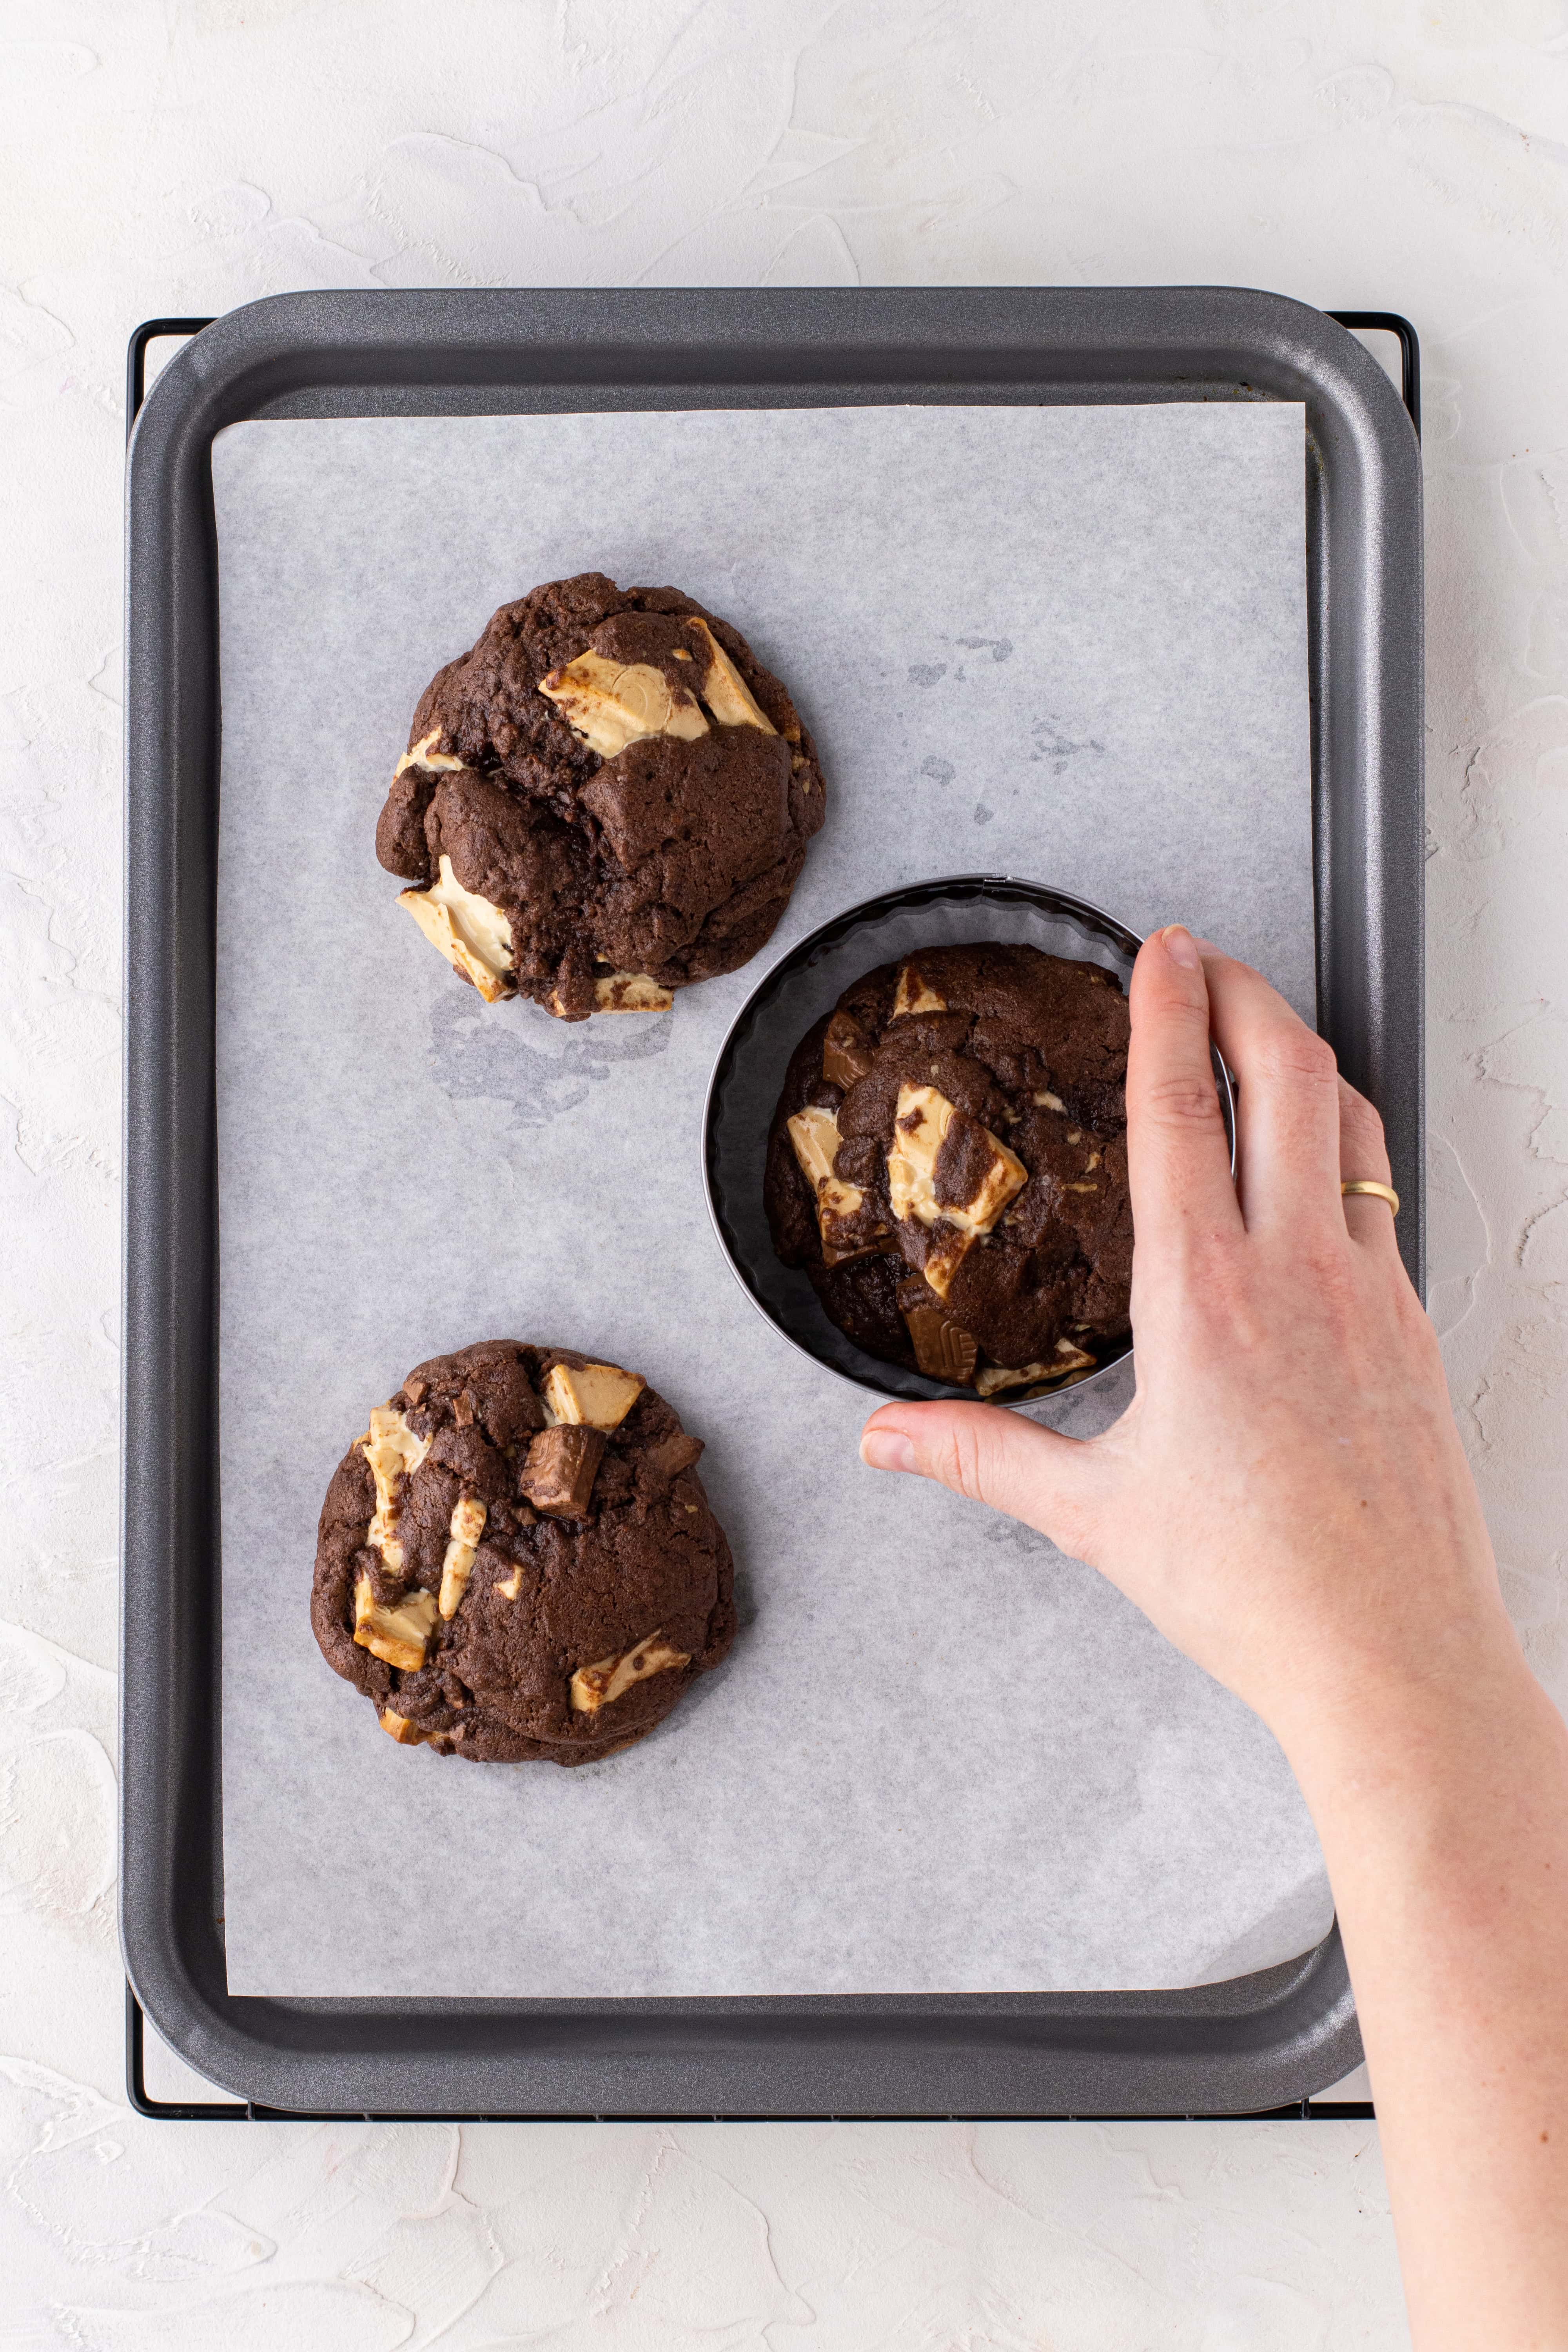
If you follow all the steps in the recipe your Caramilk Cookies should stay nice and thick once they’re baked. But for a perfectly round shape, here’s a quick tip that is a total game-changer:
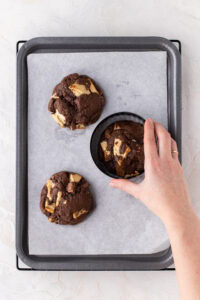
Place a large round cookie cutter on the outside of your cookies and move it in a circular motion to scoot the cookies into shape. That’s it! Now your cookies look like the real deal 😍

Storing your Caramilk Cookies
Caramilk cookies are best eaten straight from the oven whilst they’re still warm, fresh and gooey. But if you have leftovers (I doubt you will 😉) you can freeze them to enjoy another time. Here’s how:
- Layer the baked cookies between sheets of greaseproof paper to prevent them from sticking to each other.
- Place in an airtight container or baking tin.
- Store in the freezer for up to 2 months.
- When the cookie craving kicks in, either defrost at room temperature first or pop in microwave for 30-60 seconds.
Quick links to equipment & ingredients
Looking for more sweetness?
Caramilk Cookies
Rate this Recipe
Print Pin Rate this RecipeIngredients
- 200 g Cold unsalted butter take the butter out of the fridge 30 minutes before you start baking so that it's not completely solid
- 180 g Light brown sugar
- 80 g White caster sugar
- 2 large Eggs at room temperature
- 225 g Self-raising flour
- 125 g Plain flour
- 50 g Cocoa powder
- 1 tsp Salt
- 1 tsp Baking powder
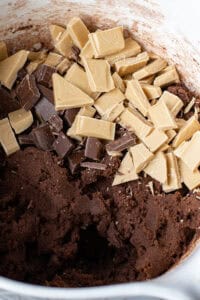
- 200 g Cadbury Caramilk
- 100 g Milk chocolate I decided to chuck in some milk chocolate chunks too but feel free to use 300g Caramilk instead
Instructions
Start by making the cookie dough
- Chop up the butter into chunks and place in a large mixing bowl. Beat using an electric mixer or wooden spoon for 1 minute. You want the butter to be slightly softer, broken up, but not at the 'creamed' stage.
- Add the light brown sugar and white caster sugar and beat together until just combined. Try not to over-mix at this stage otherwise the butter will become too soft.
- Mix in both of the eggs. The mixture won't look very appealing at this stage but don't worry it will do soon!
- In a separate bowl, stir together the self-raising flour, plain flour, cocoa powder, salt and baking powder until well mixed. Tip into the butter mixture and fold everything together until it forms a thick cookie dough.
- Chop up the Caramilk and milk chocolate into big chunks and add to the cookie dough. Use your hands to mix them into the dough.
Shaping the cookie dough
- Line a baking tray or tin (one that will fit inside your freezer) with greaseproof paper.
- Weigh out 120g of the cookie dough, then use your hands to roughly shape it into a ball and place it on the baking tray. Thick cookies are meant to look rustic, so lumps and bumps on the cookie dough is exactly what you're looking for.
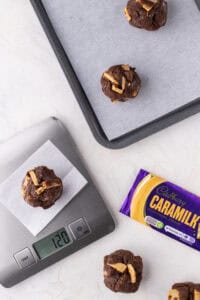
- Repeat this step until all the cookie dough is used up. You should get between 9-10 cookies in total. At this stage, you don't have to worry about the cookies being too close together on the baking tray. As long as they're not touching it's all good.

- Cover the baking tray with clingfilm and freeze the cookie dough balls for at least 90 minutes or up to 48 hours for best results. The longer you leave them, the thicker your cookies will be.
Baking the cookies
- Whilst the cookies are in the freezer, preheat your oven to 180°C (fan).
- Do this step 5 minutes before the freezing time is finished: line a large baking tray with greaseproof paper and place in the oven for 5 minutes to heat up. The heated tray will help the cookies crisp up and brown on the outside but still keep a gooey centre.
- Place 3 to 4 of the frozen cookie dough balls onto the tray. These cookies are very chunky so make sure you leave plenty of room between them. Bake the cookies in batches if you need to.
- Bake on the middle shelf of your oven for 12-15 minutes until firm on the outside edge but still soft and under-baked in the middle. The cookies should still be nice and thick, with very little spread. You can use a round cookie cutter to scoot them into shape.
- Leave to cool for 5 minutes on the baking tray, or just until you're happy to pick them up without them falling apart.
- Enjoy your cookies!
Notes
More cookie recipes to fall in love with
This post contains affiliate links which means I will make a small commission if you purchase through those links. I only recommend products that I know, trust and love!
Where do you get cara milk in the USA?
After years of searching, I’ve found the perfect cookie recipe! Whilst the others I’ve tried were ok, these ones here were an instant hit with family and friends alike. Thank you so much for sharing!
I did substitute white cooking chocolate for the caramilk and they were still fantastic.
Just a question though, could normal Cadbury chocolate be used instead? Though I started baking a while ago, I’m still very new to the cans and cannots of the art.
Cheers!
Hi Adam
What a lovely comment, thanks so much for taking the time to leave a review and rating. It really means a lot 😊 I’m so pleased to hear that you and your family loved the cookies. They’re a favourite of mine too!
Yes absolutely you can use normal Cadbury chocolate. Any type of chocolate chopped up would work in these cookies. Enjoy experimenting with different flavours 🍪
your recipes are very similar to Cupcake Jemma’s recipes. Almost identical, did you use to work there?
Hi Marie!
I wish! What a dream job 😍 all of my recipes are developed from scratch and go through 2-3 rounds of testing before being shared with you guys. You’ll find that cookies are made using the same handful of ingredients (butter, 2 types of sugar, eggs, flours etc.) but I can assure you this recipe is 100% my own 😊
They look AMAZING 🤩
Thanks Ava! Enjoy 😊