Mini Red Velvet Cakes
By Jessie
Updated: July 7, 2025
Rate This Recipe
By: Jessie
Updated: July 7, 2025
Rate This Recipe:
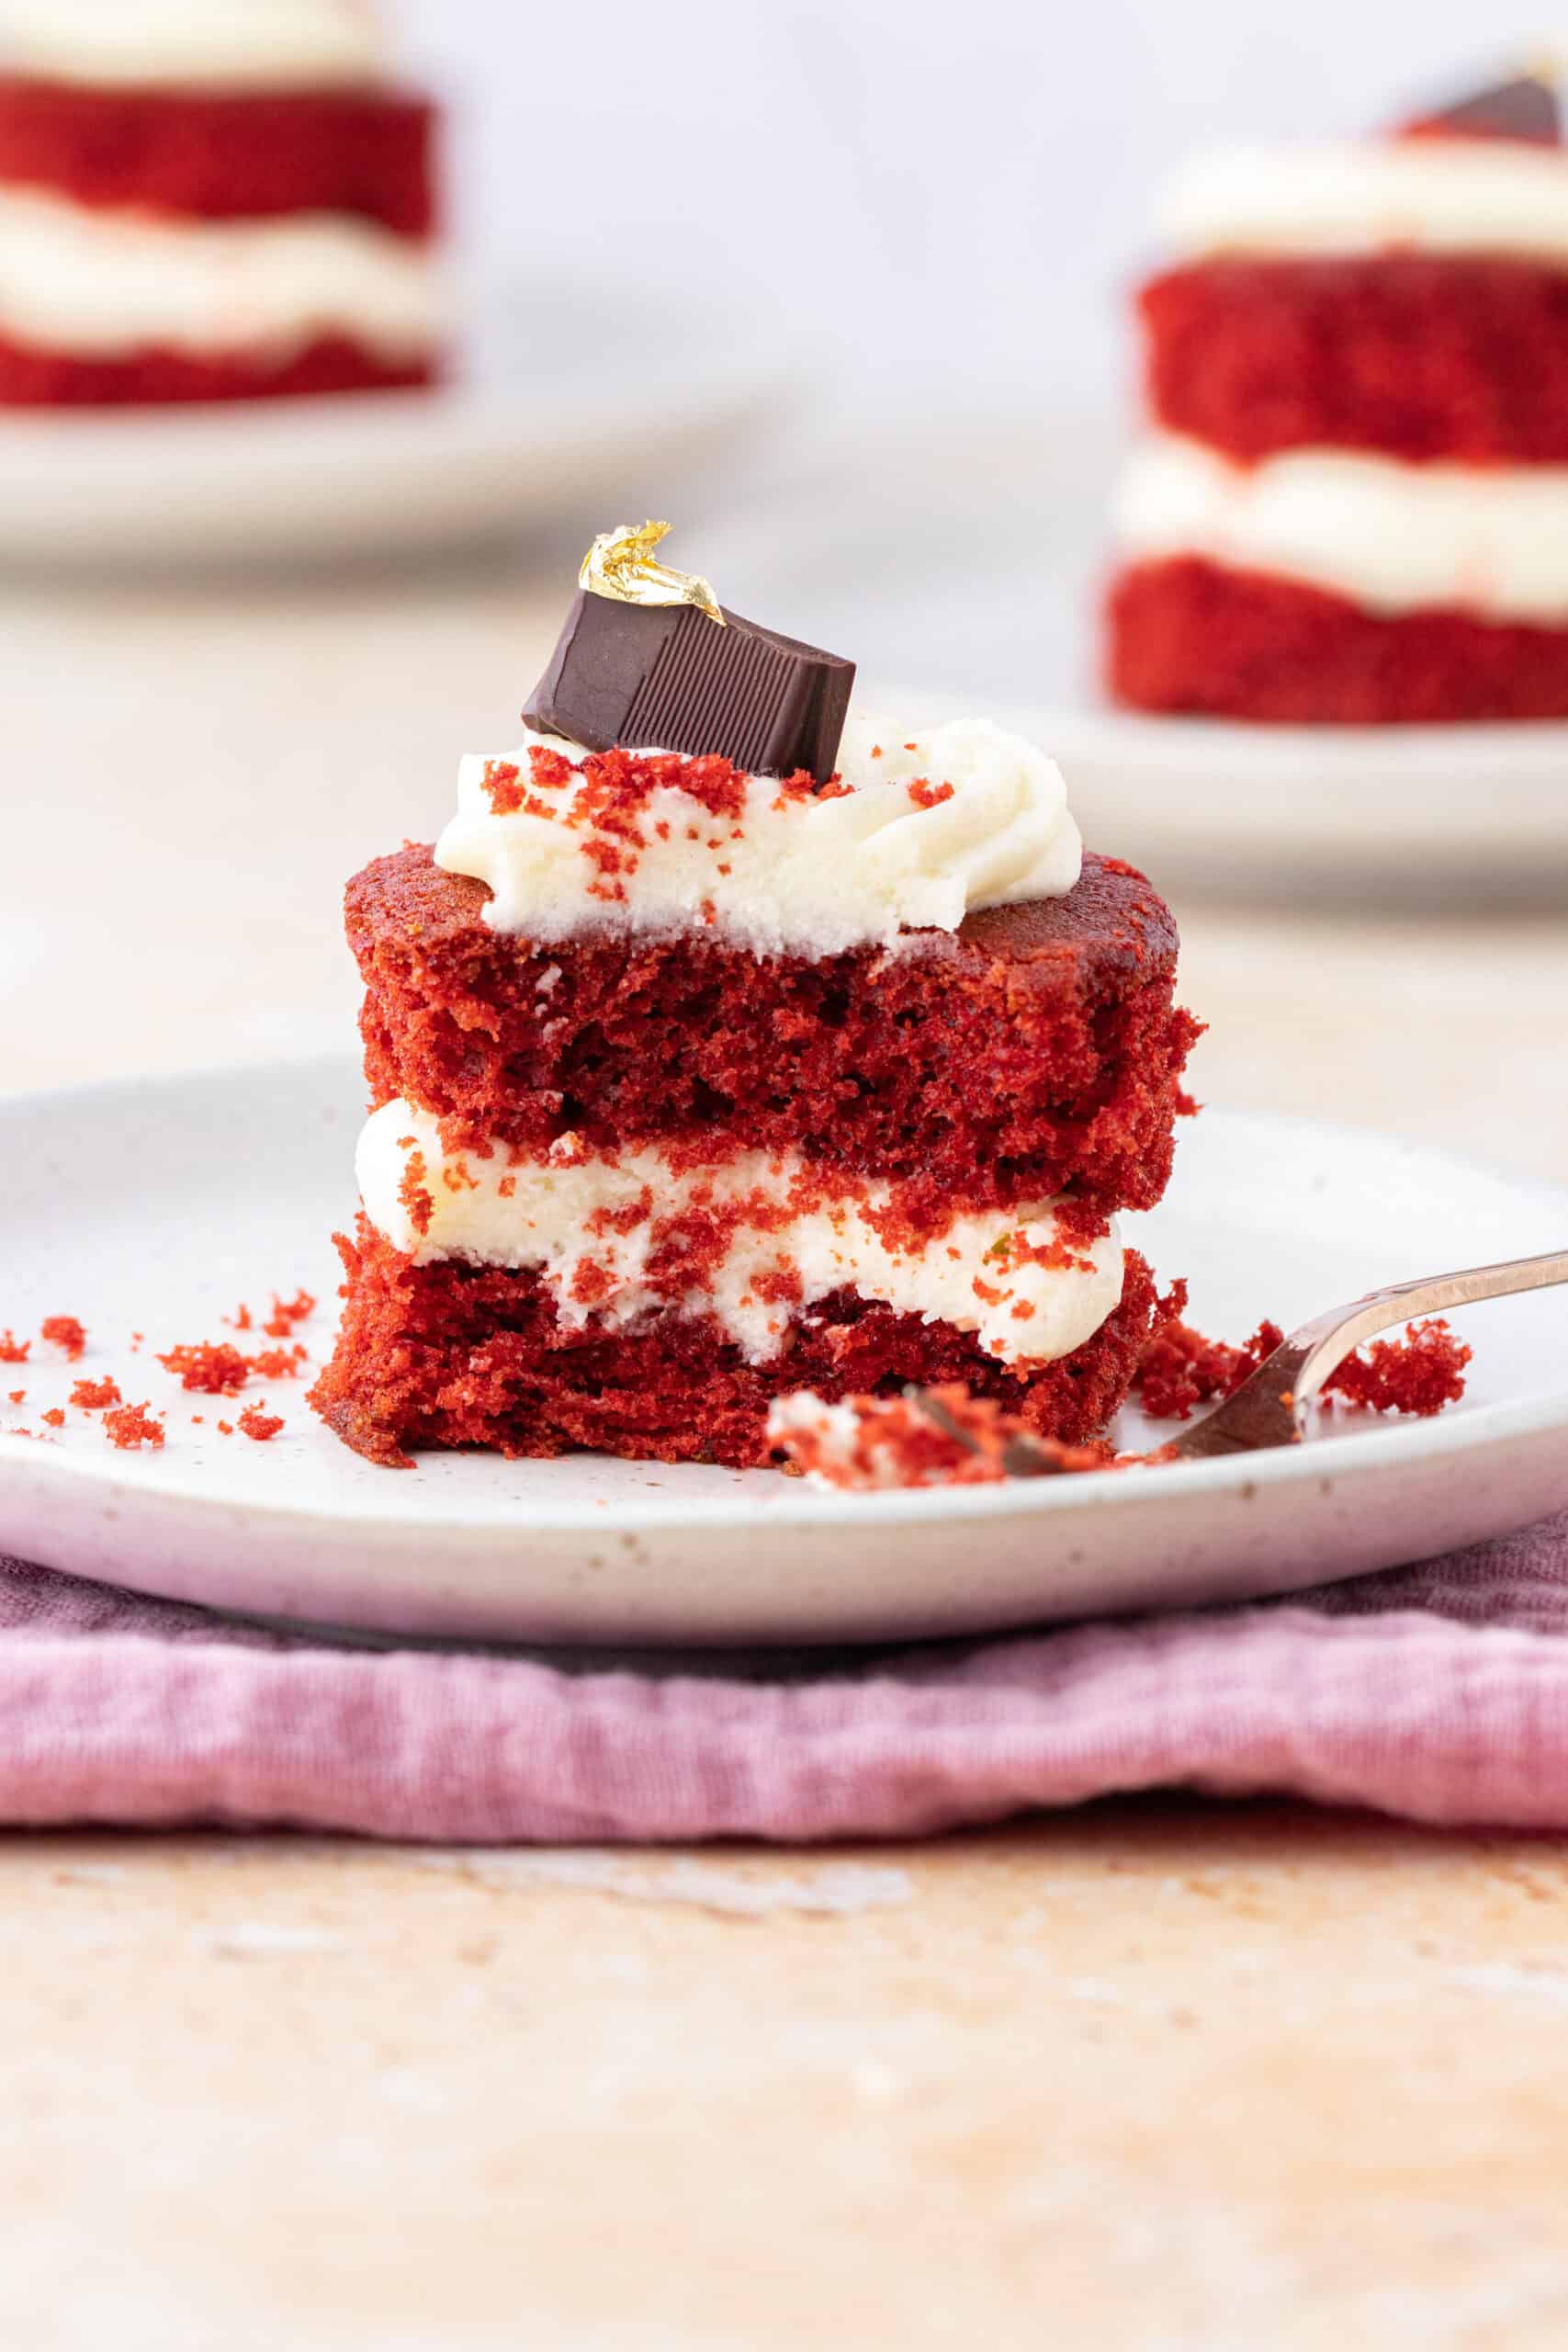
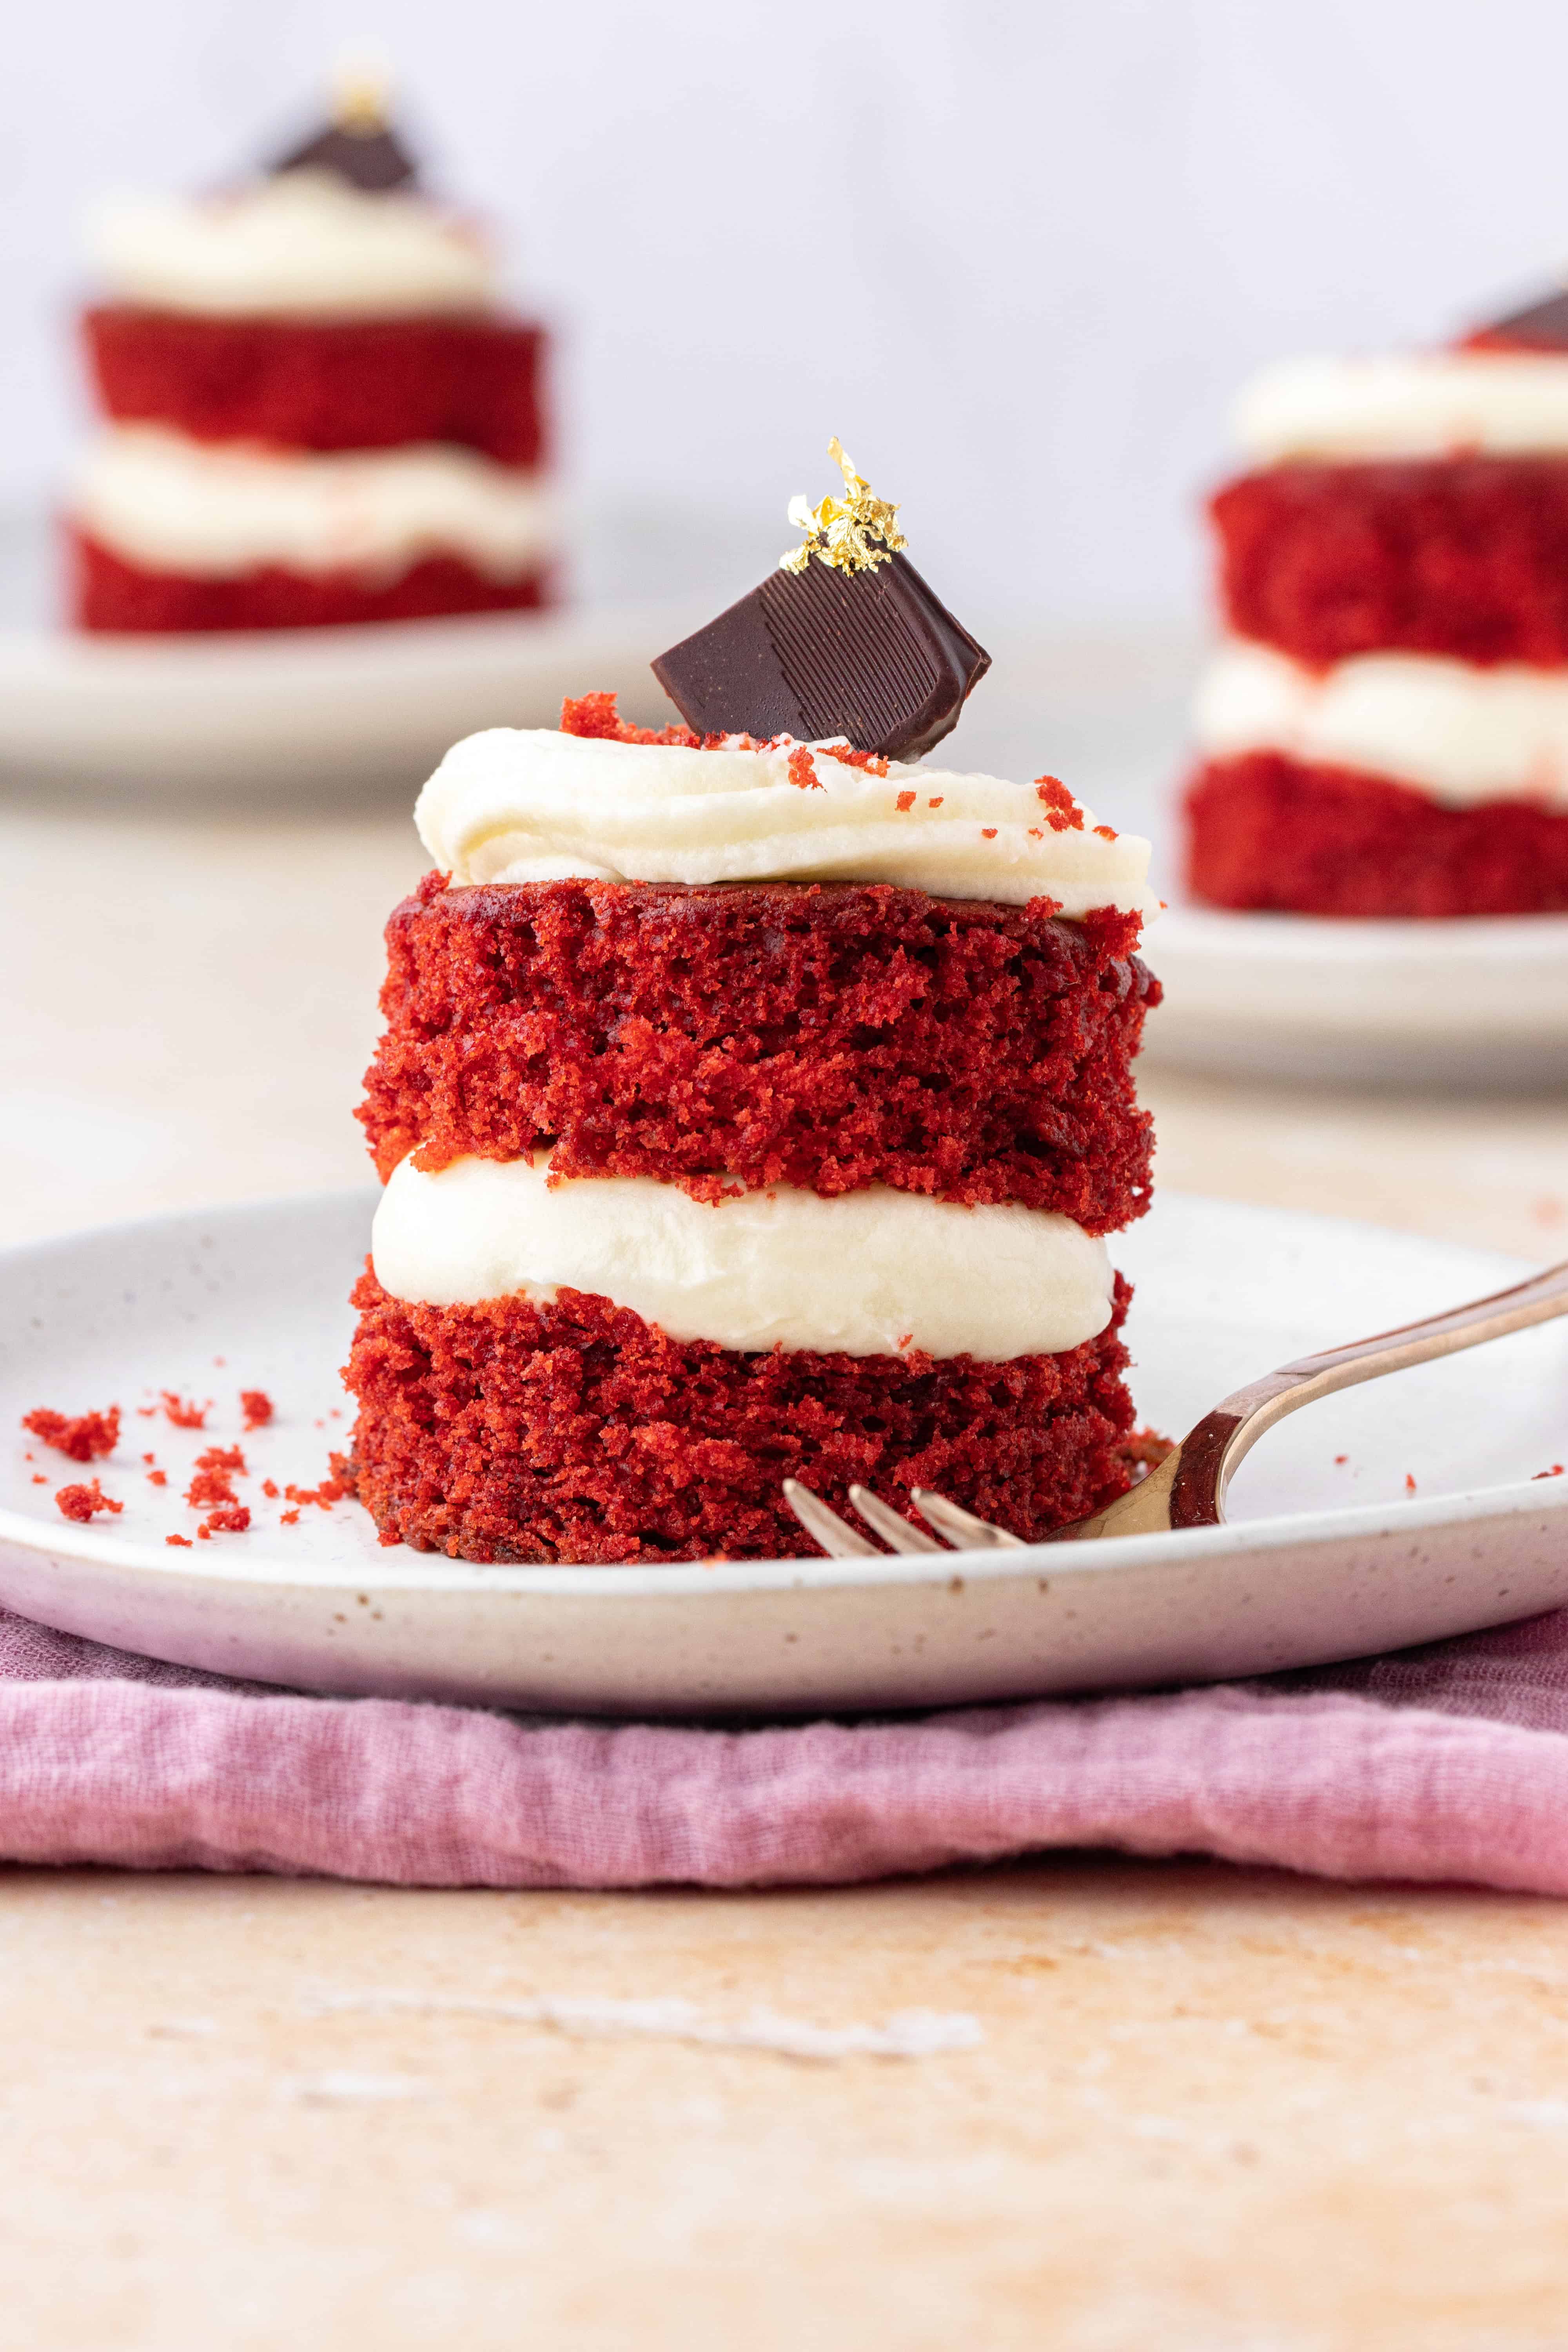
These cuter than cute mini red velvet cakes are the perfect afternoon tea treat. The red velvet sponge layers are soft, fluffy and light. They’re sandwiched together and topped with tangy cream cheese frosting, and decorated with a sprinkle of cake crumbs and a square of dark chocolate.
If you’re a big fan of red velvet bakes, you should also check out these soft and gooey red velvet cookies and these rich and fudgy red velvet brownies!
About these Mini Red Velvet Cakes
- TASTE: how to describe the taste of red velvet!? Part chocolate, part vanilla with a touch of tanginess from the cream cheese frosting.
- TEXTURE: red velvet sponge is super soft and light. The frosting is smooth and creamy.
- EASE: The mini red velvet cakes are cut out of a large rectangular sponge. It’s a little extra effort, but well worth it!
- PERFECT FOR: afternoon tea, elevenses or to impress your friends and family.

What ingredients do I need?
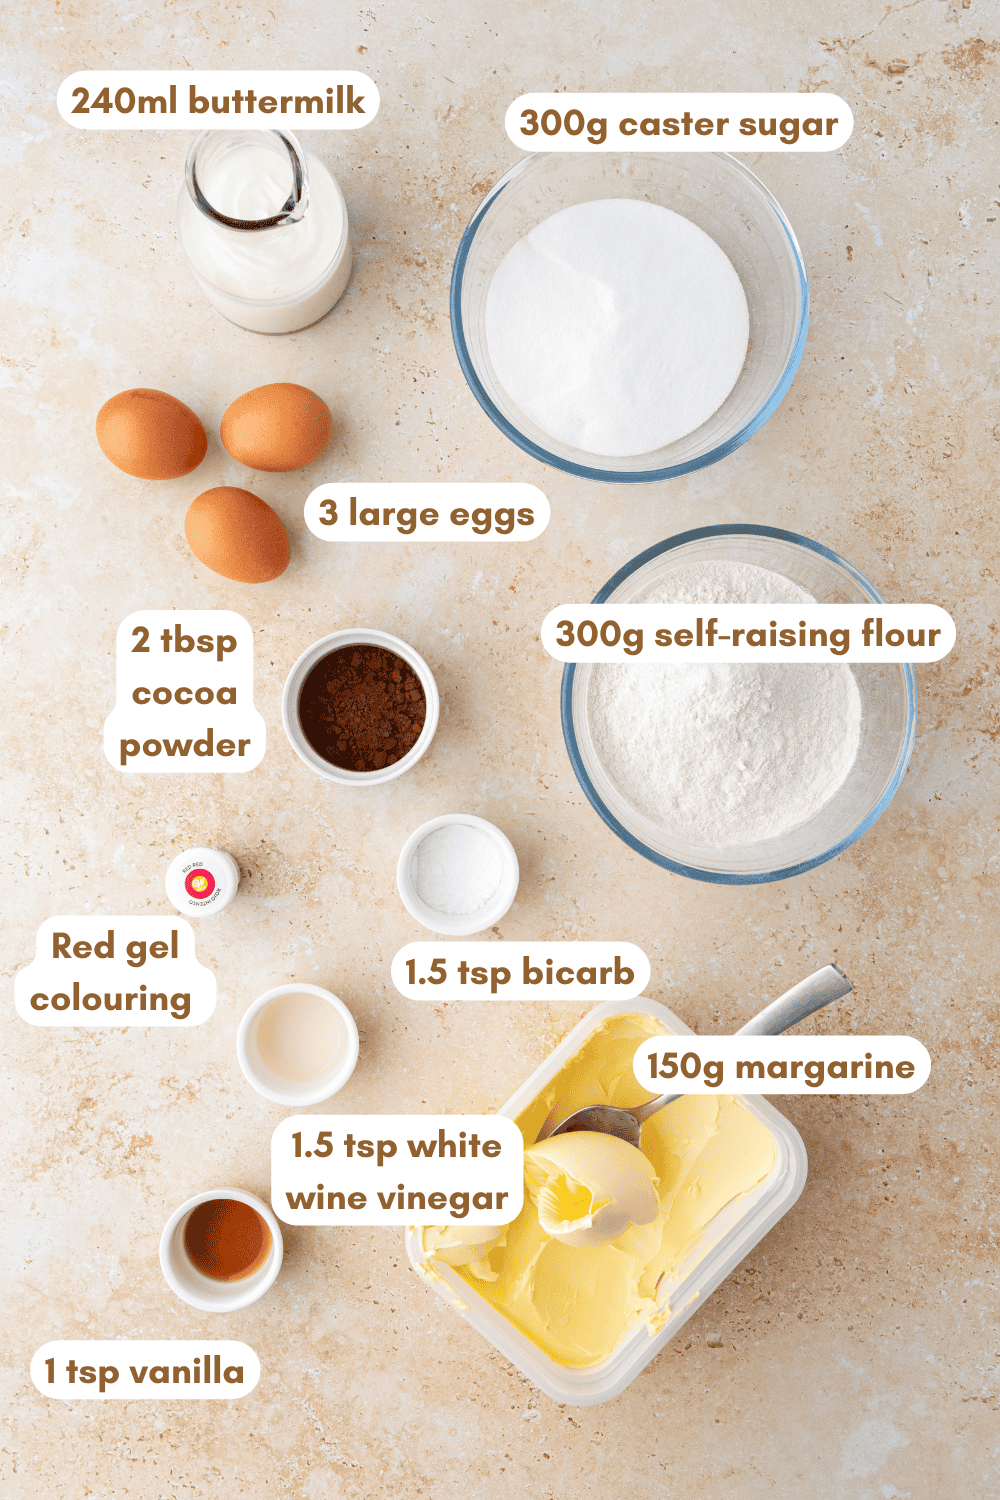
The unique thing about a red velvet cake is its chocolate and vanilla flavour combo. It’s also made using buttermilk, white wine vinegar and bicarbonate of soda which adds a subtle tanginess and makes the sponge super soft and light. Here’s a list of ingredients used to make mini red velvet cakes:
- Margarine/Unsalted butter – my go-to is Stork margarine. It makes the cake light and fluffy.
- White caster sugar
- Eggs – 3 large or 4 medium eggs are needed. Also make sure they’re at room temperature.
- Vanilla extract – invest in a high-quality extract like Nielsen-Massey for the best flavour.
- Self-raising flour
- Cocoa powder – sift the cocoa powder to remove any big lumps.
- Buttermilk – thicker than normal milk, almost the texture of yoghurt, with a tangy flavour.
- White wine vinegar – mixed with the bicarb, a little vinegar makes your sponge light and tender and intensifies the red colour.
- Bicarbonate of soda
- Red food colouring gel – use a concentrated gel/paste to get a vibrant red. My favourites are either Wilton’s Red Red or Sugarflair’s Red Extra.
- Cream cheese frosting – butter, icing sugar and full-fat cream cheese are needed to make the frosting.
How to make mini red velvet cakes
The good news is you don’t need any fancy equipment or baking tin to make mini red velvet cakes, and the recipe is actually very easy even though it requires a fair few ingredients. Here’s a quick overview of how to make them:
- To make the red velvet sponge; butter, sugar, eggs and vanilla are mixed together. Then the dry ingredients and buttermilk are folded into the mixture in three stages. The final step is to add the food colouring to turn the batter bright red.
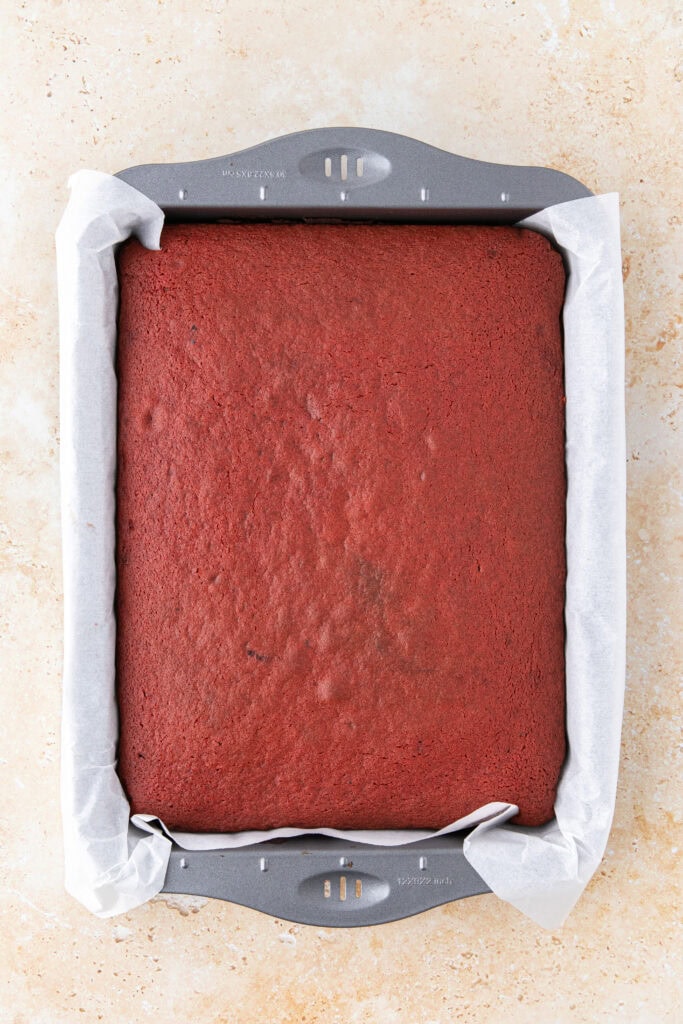
- The sponge goes in the oven for 35-40 minutes until risen and springy to the touch.
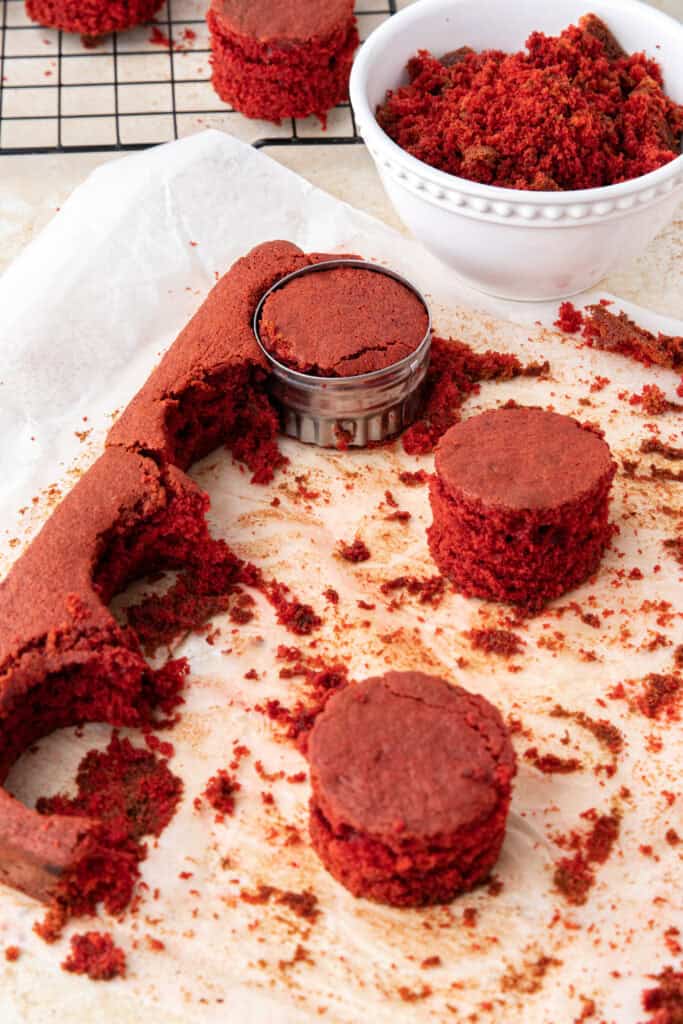
- Once the sponge is cool, a smallish round cookie cutter is used to stamp out the mini red velvet cakes. Each one is then sliced to make two halves.
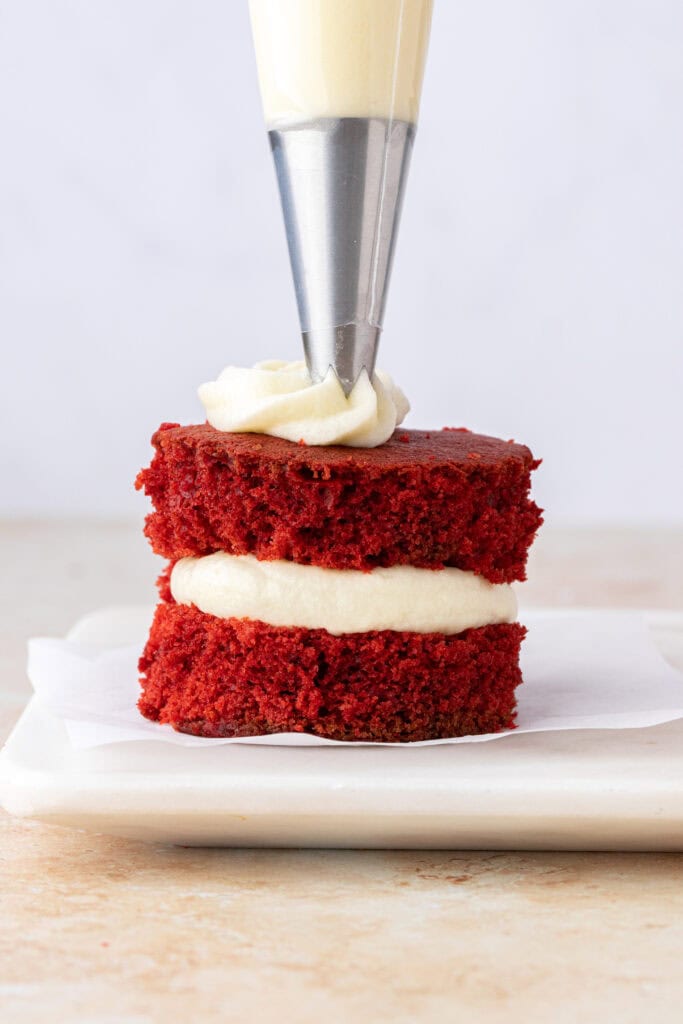
- The mini cakes are filled and topped with cream cheese frosting.
- A little sprinkle of red velvet cake crumbs is the finishing touch.
Grab a fork and dig in!
Use the leftover cake crumbs to make Red Velvet Cake Bites
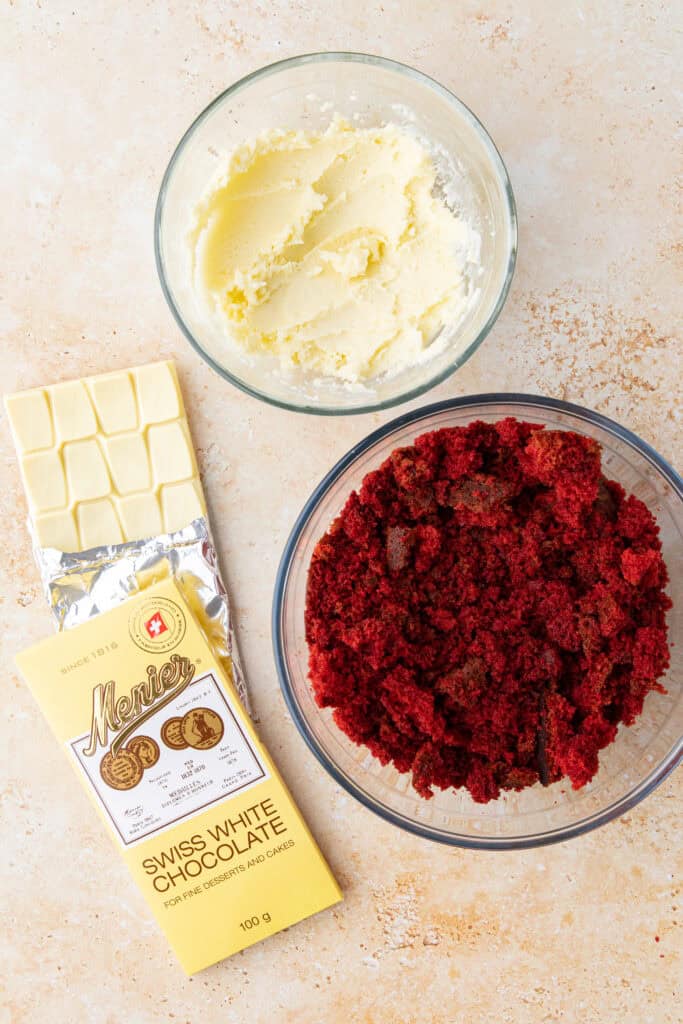
Don’t let anything go to waste and make these delicious red velvet cake bites using the leftover cake crumbs. All you need is white chocolate, cream cheese frosting and your leftover red velvet cake. Here’s how to make them:
- Crumble the leftover red velvet cake into a bowl.
- Mix the cake crumbs and cream cheese frosting together. Reserve a handful of crumbs for the decoration.
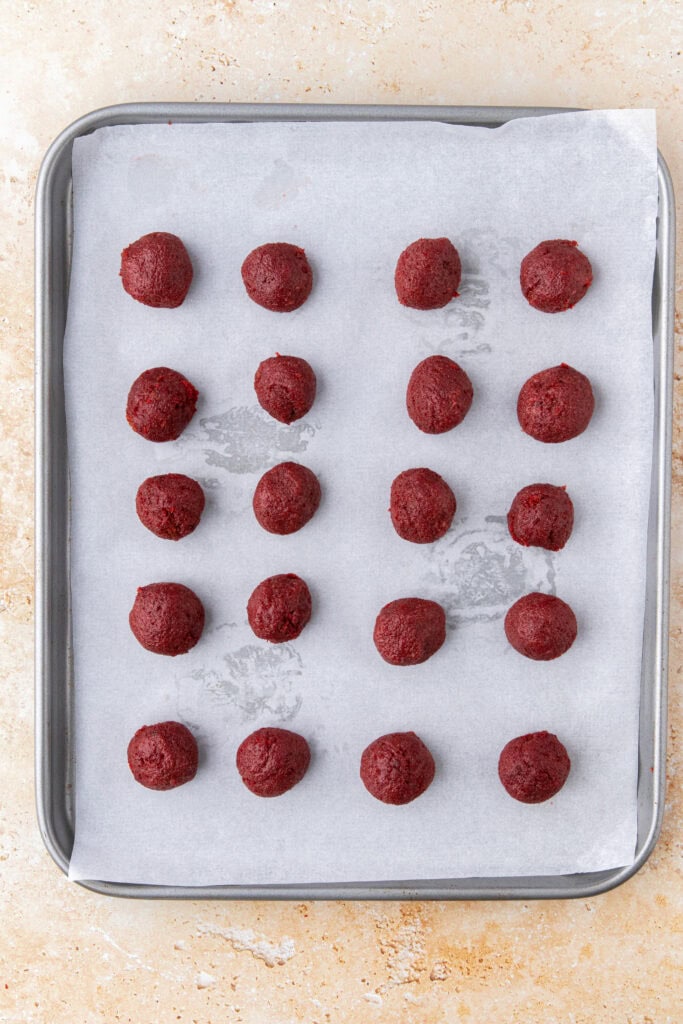
- Roll the mixture into small balls and place in the freezer for 30 minutes.
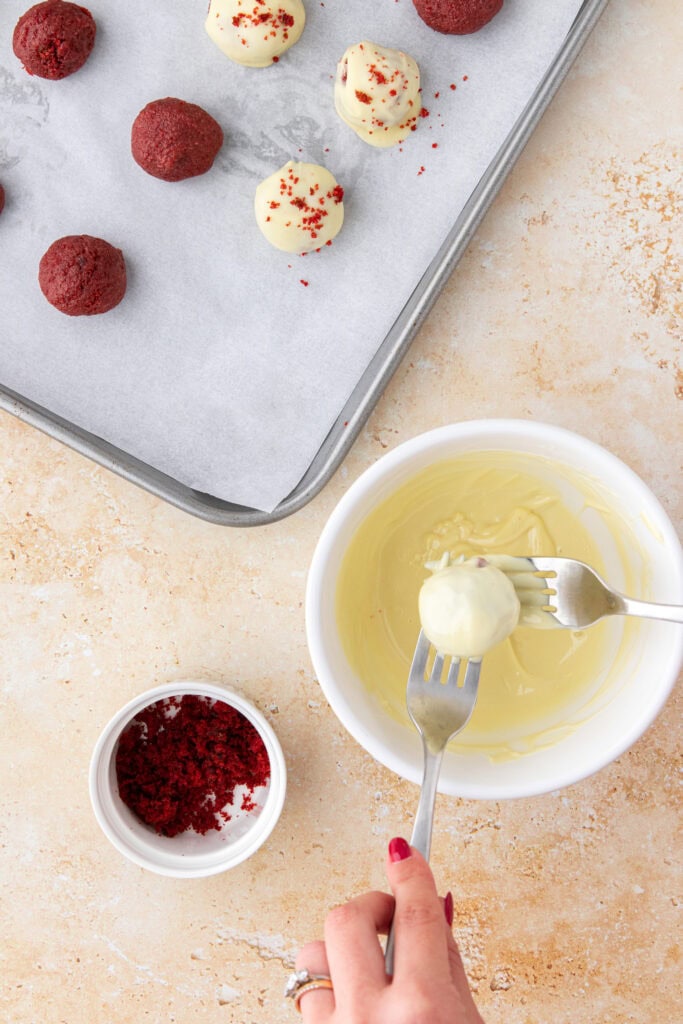
- Melt the white chocolate and then use two forks to coat the balls.
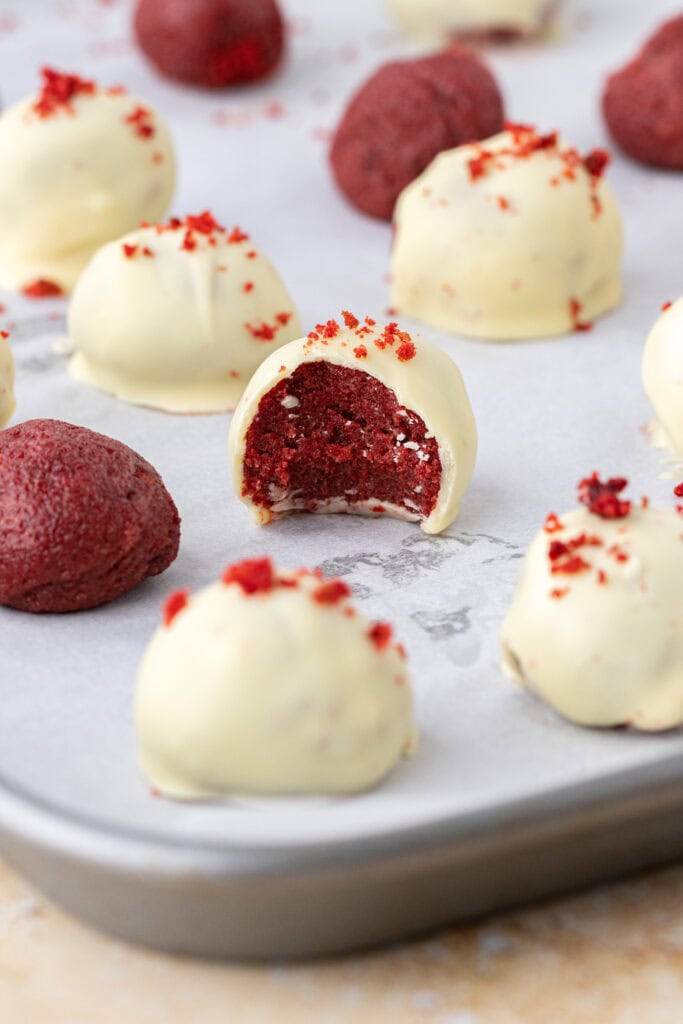
- Place on the baking tray and sprinkle them with cake crumbs.
- Pop in the fridge until set.
Equipment used to make mini red velvet cakes
Let’s hang out
Follow me on social media for recipe videos, baking chats and food photography tips.
Mini Red Velvet Cakes
Rate this Recipe
Print Pin Rate this RecipeIngredients
Red velvet sponge
- 150 g Margarine or unsalted butter If you're using Stork, use it cold straight from the fridge. If you're using butter, then make sure it's at room temperature.
- 300 g White caster sugar
- 3 large Eggs at room temperature
- 1 tsp Vanilla extract
- 300 g Self-raising flour
- 2 tbsp Cocoa powder
- 240 ml Buttermilk
- 0.5-1 tsp Red gel food colouring I highly recommend Wilton's Red Red or Sugarflair's Red Extra
- 1.5 tsp White wine vinegar
- 1.5 tsp Bicarbonate of soda
Cream cheese frosting
- 100 g Unsalted butter soft at room temperature
- 100 g Full-fat Philadelphia cream cheese cold from the fridge
- 200 g Icing sugar
Instructions
Make the red velvet cake mixture
- Preheat the oven to 160°C fan.
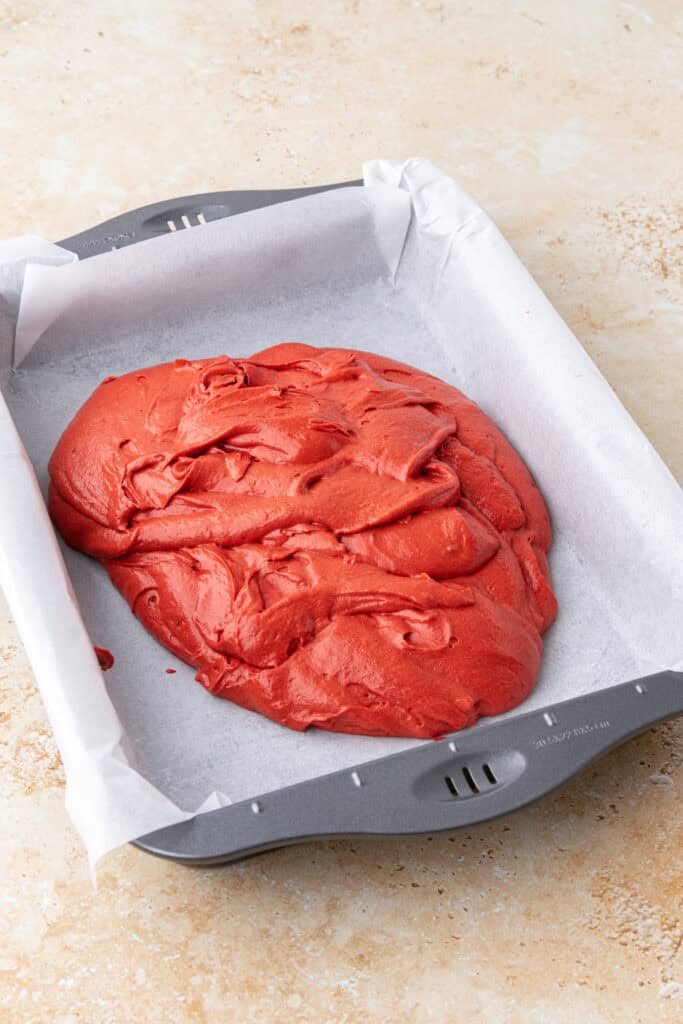
- Line a large rectangular baking tin with greaseproof paper. The tray I used was 12x9x2 inches.
- In a large mixing bowl, beat the margarine (or butter), caster sugar and vanilla extract together until creamy.
- Mix in the eggs one at a time, adding a teaspoon of flour with each to stop the mixture from curdling. Set the bowl aside for now.
- In a separate bowl sift the flour and cocoa powder together.
- Tip a third of the dry ingredients into the creamed butter mixture, and pour in a third of the buttermilk. Fold together until just combined. Repeat this process twice more until everything is well mixed.
- Now add the red food colouring to make the batter bright red. I use the Wilton Red Red gel colouring and added roughly a teaspoon in total.
- In a small bowl, combine the white wine vinegar and bicarbonate of soda and quickly fold it into the cake mixture.
- Spoon into the baking tin and bake for 40-45 minutes until risen on top and a toothpick inserted in the middle of the cake comes out clean.
- Leave to cool in the baking tin for 20 minutes, then pop in the fridge for 30-45 minutes or until completely cool. Putting the cake in the fridge will make it less messy when cutting out the cakes, as the crumbs will be more compact.
Cut out the mini red velvet cakes
- Once the sponge is cool, use a round cookie cutter to stamp out the mini cakes. My cutter had a 2.5inch diameter and I managed to get 10 cakes in total.
- Slice each cake sideways to make two halves.
- Save some of the leftover crumbs for decoration, and use the rest to make red velvet cake pops (read more about this in the blog post above).
Now make the cream cheese frosting
- Beat the butter until really soft and pale in colour.
- Sift in half the icing sugar and beat until smooth. Sift in the remaining icing sugar and beat again until you have a smooth and creamy frosting.
- Now take the cream cheese out of the fridge and add to the bowl.
- Gently fold the cream cheese into the frosting until smooth. Be careful not to overdo it, as it can quickly become runny.
Assemble the mini red velvet cakes
- Sandwich the sponges together using the frosting. You can either use a piping bag to make them super neat, or just spread the frosting on with a spoon.
- Pipe a swirl of frosting on top of each mini cake and finish with a sprinkle of cake crumbs. For a bit of extra pizzaz, I decorated them with a square of dark chocolate dipped in edible gold leaf.
Notes
More cake recipes to love
This post contains affiliate links which means I will make a small commission if you purchase through those links. I only recommend products that I know, trust and love!